Cook's Country
Darn Good Desserts
9/21/2024 | 26m 25sVideo has Closed Captions
S'Mores Pie, M&M Cookies; our recommended Rolling Pins
Host Bridget Lancaster makes host Julia Collin Davison a scrumptious S'Mores Pie. Equipment expert Adam Ried reveals our top picks for rolling pins. Test cook Morgan Bolling and host Toni Tipton-Martin bake up M&M Cookies.
Cook's Country is presented by your local public television station.
Distributed nationally by American Public Television
Cook's Country
Darn Good Desserts
9/21/2024 | 26m 25sVideo has Closed Captions
Host Bridget Lancaster makes host Julia Collin Davison a scrumptious S'Mores Pie. Equipment expert Adam Ried reveals our top picks for rolling pins. Test cook Morgan Bolling and host Toni Tipton-Martin bake up M&M Cookies.
How to Watch Cook's Country
Cook's Country is available to stream on pbs.org and the free PBS App, available on iPhone, Apple TV, Android TV, Android smartphones, Amazon Fire TV, Amazon Fire Tablet, Roku, Samsung Smart TV, and Vizio.
Providing Support for PBS.org
Learn Moreabout PBS online sponsorship♪♪ -"Cook's Country" is about more than just getting dinner on the table.
We're also fascinated by the people and stories behind the dishes.
We go inside kitchens in every corner of the country to learn how real people cook.
And we look back through time to see how history influences the way we eat today.
We bring that inspiration back to our test kitchen so we can share it with you.
This is "Cook's Country."
♪♪ -Today on "Cook's Country," Bridget makes Julia a decadent s'mores pie.
Adam shares our recommended rolling pins, and Morgan and I make M&M cookies.
That's all right here on "Cook's Country."
-Funding for this program has been provided by the following.
-Monument Grills, offering innovative technology and design for the grilling enthusiast.
With a lineup of gas grills to suit every level, our mission is to ignite your passion to pursue the art of grilling.
Learn more at monumentgrills.com.
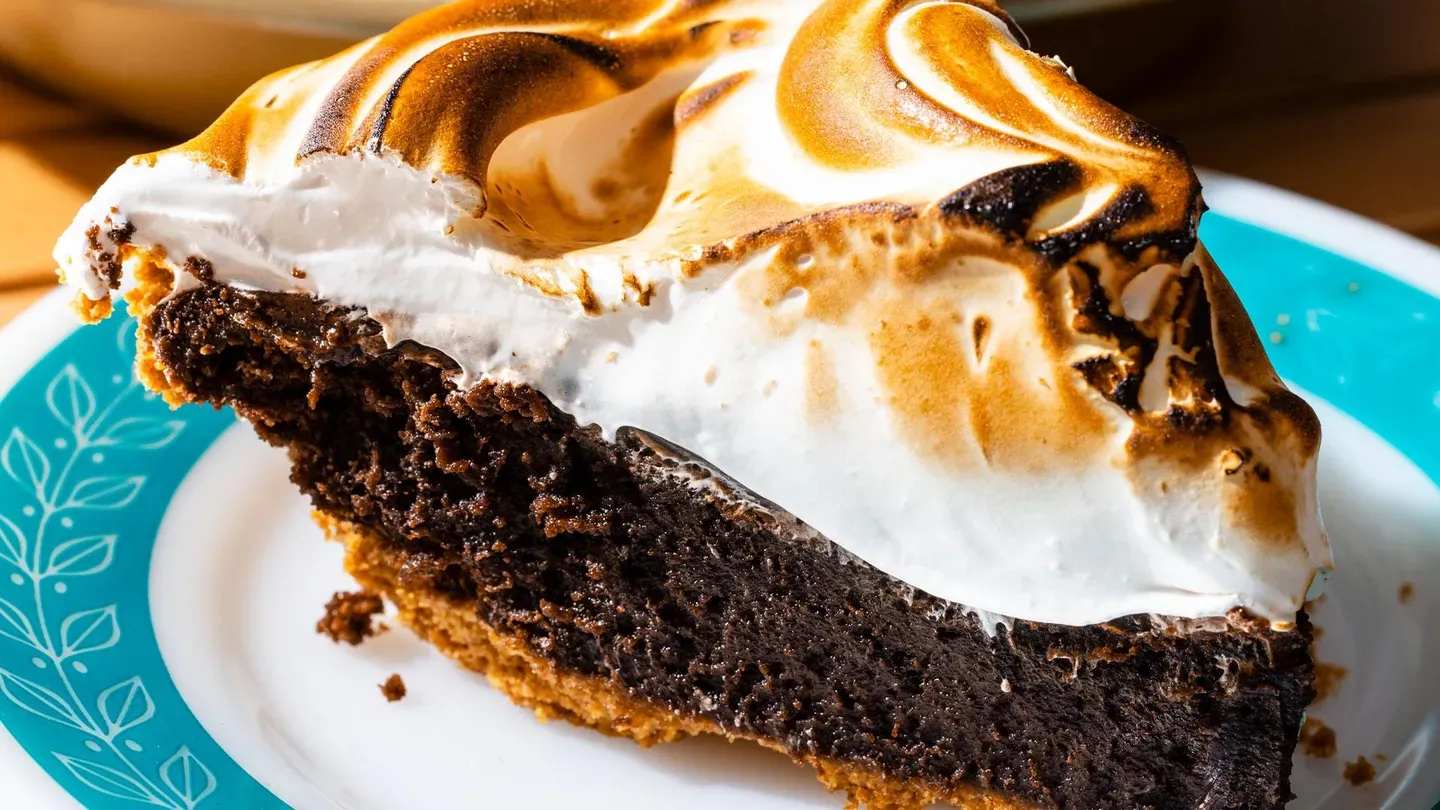
♪♪ -The trio of textures and flavors in a s'more are perfection.
You have that wheaty, crunchy graham cracker that slightly melted chocolate, held together with gooey toasted marshmallow.
And today, Bridget's going to take that beautiful trio and make a pie.
-Yes, because what could be better than s'mores in pie form?
It's fantastic.
It's super easy to do.
You're going to see, we're going to take a lot of inspiration from the s'mores, starting with our crumb crust.
This is 12 whole graham crackers.
There are about 6.5 ounces.
And I've broken them into smaller pieces here.
Snack size.
-Snack size.
Exactly.
Yes, I've counted every single piece.
-This goes on, and I'm going to process this for about 30 seconds, until it's nice and fine.
Now we do want to add a little sweetness here.
This is 2 tablespoons of granulated sugar.
And just a little bit of salt, 1/8 teaspoon.
I'm going to pulse this in just to make sure it's all well distributed.
I'm sending SOS signals.
-[ Laughs ] -And I've got 6 tablespoons of unsalted butter, melted obviously.
Pour that right in.
And then this time I'm going to pulse the butter in until it's well distributed.
That's going to take about eight pulses, maybe a little more.
That was eight pulses with sass.
-[ Laughs ] -Alright, so, now we're going to put this into our pie plate.
This is a nine-inch nonstick pie plate.
I'm going to do this in a couple of stages, but I always like to establish the bottom part of the crust before I go in and build up the sides.
And now I'll start working in the rest.
Alright, so, now I'm just going to start kind of divvying this up around the edges.
And I'm going to just take my cup here and start working it around, pressing it at an angle.
This is going to go into a 325-degree oven.
We're going to leave it in there until it's nice and fragrant.
And it'll start to change color just a little bit.
That's going to take 16 to 18 minutes.
Alright, Julia, our crust is out of the oven.
It's got a little tan.
Very fragrant.
Definitely representing graham crackers.
The next step is chocolate.
We're going to go with something a little more decadent, a little bit more adult.
So, we're taking the chocolate filling and breaking it into two parts.
And the first part is a brownie.
-Really?
-Yeah.
Fudgy dark, delicious.
-In the bottom of a pie?
-Yeah.
This is 6 ounces of bittersweet chocolate.
I've finely chopped it here.
And I've got 5 tablespoons of vegetable oil, along with 4 tablespoons of unsalted butter.
So, the butter, of course, is going to add some great flavor.
But the vegetable oil is what gives it that really good fudgy texture, because oil stays in that liquid state at room temp.
Got a little bit of Dutch processed cocoa here, too.
Just 2 tablespoons.
-Mmm.
-Alright, so, I'm going to take this back to the microwave.
And we're going to microwave it at 50% power for about two minutes.
I want to stir it every 30 seconds or so just to make sure that the chocolate's melting evenly.
I'm stirring this, and you can see that some of the pieces of chocolate are melted, but some are not.
That's why we stir every 30 seconds or so.
That's lovely, beautiful and smooth.
We need to let this cool for just about five minutes before we move on.
-Alright.
-Alright, our chocolate has been cooling just for about five minutes.
We're adding eggs in this next batch, so I wanted to cool it down so we didn't get scrambled chocolate eggs.
-Makes sense.
-Not good.
Alright, so let's turn this into a brownie.
This is a cup of packed light brown sugar.
That's about 7 ounces, if you want to weigh it.
We've got three whole eggs.
Some vanilla extract.
This is a tablespoon.
Always perfect with chocolate.
And a little bit of salt.
This is 1/2 teaspoon of salt.
I always think it's necessary for brownies especially to have a little bit of salt.
Then now, this would be how I would like to eat my brownies, but we got to add flour for it to technically be a brownie.
This is a 1/4 cup of all-purpose flour.
Just enough.
That's not a lot of flour.
-No.
-This is a very rich brownie.
-Oh, yeah, it's the right proportion as far as I'm concerned there.
And I'm going to bring this up to my pie plate and just pour this right in.
Alright.
I just want to make it even.
But this is going to go back into that 325-degree oven, this time for about 40 minutes.
Oh!
Ah, love a good brownie with that shiny, crackly top.
Alright, so, I do need to see if it's done.
And you can see around the edges that it's more set, but in the center take a little toothpick in there so you can see those beautiful, just a couple of moist crumbs there.
That's a good sign.
We want fudginess in there.
Alright, so, we can move on.
But this needs to cool for at least 10 minutes.
Let it set up a little bit.
And up to an hour.
-Okay.
-Which gives us plenty of time for Part 2: Chocolate Boogaloo.
-More chocolate!
-Chocolate, chocolate everywhere.
So, this is our kind of ganache-y, even fudgier layer than the fudge brownies.
That's going to go right on top.
So good.
This is 4 ounces of milk chocolate this time.
We used bittersweet there because it's in a brownie and dilutes the flavor.
This is milk chocolate because we want to have a little nod to the original s'mores.
So, this is just chopped finely.
I'm going to add 1/3 cup of heavy cream and 2 tablespoons of light corn syrup.
This is just going to give it a really glossy fudgy texture.
Alright, so, same thing as before.
This is going to go back in the microwave, this time for about 1 to 2 minutes.
I'm going to cook it on 50% power and I'll stir it every 30 seconds.
-Ah, the microwave dance.
-Alright, so, let's take a look at this.
It's just getting more and more silky.
We don't want to put this on right away.
We want to let it set up and get even fudgier.
So, we're going to leave this to cool completely for about 30 minutes.
-Alright.
-Our chocolate mixture has cooled completely.
Alright, so, now, right on to that brownie layer.
You can thank me later.
-Oh, goodness.
It's the miracle pie.
Alright.
I'm just going to take this basically out to that edge of the brownie.
Alright, and then I'm going to keep doing this.
But then we're going to leave this at room temperature.
We're going to let it cool completely.
And that's going to take about three hours.
Oh, there's, like, some -- -Absolutely amazing.
-It's been three hours.
This has set up just enough.
Let's see, we've covered the graham crackers.
We've covered the chocolate filling.
What's left but the marshmallow?
-Okay.
-Yes.
Now, we're not just melting marshmallows on top because they would get really hard and crusty and kind of strange.
But we are going to make a meringue.
That's what marshmallows are made of.
We're using a Swiss meringue method so that the meringue is going to be cooked through.
It's going to be nice and stable, very easy to do.
I've got 3/4 cup of granulated sugar -- just goes right into my standing mixer bowl here -- and three egg whites.
I've got 1/2 teaspoon of vanilla extract, 1/4 teaspoon of cream of tartar.
As you know, this is just a little acid in here.
So, an acidic ingredient in here like lemon juice or cream of tartar.
It's going to help prevent the egg whites from getting too bound together.
-Mm-hmm.
-Alright.
-Little insurance.
-Yes.
Again, that was 1/4 teaspoon and just a pinch of table salt.
Alright, I'll whisk all of this together.
Alright, so, that looks well mixed together.
Now let's move on over to the stove.
I've got a saucepan with about an inch of water in the bottom.
It's just barely simmering.
You don't want it to simmer too much.
And you also don't want enough water that it's going to touch the bottom of this because it'll start to cook those eggs.
So, this is just going to go right on top.
And I'll use my whisk to constantly but gently really whisk this mixture.
We're not looking to incorporate any air, but we're looking to cook the mixture until it's about 160, 165.
Alright, you see there?
We're fluctuating a little bit between 160 and 165 in a few places.
So, this is done.
-Nice.
-Alright.
Give that to you.
Alright, let's move over here to my standing mixer.
You can see the steam coming off of that.
So, this is nice and stabilized.
And now we're going to let this go.
So, I'm going to put this on high.
We're going to let it go for about three minutes.
Ah, so good.
That was only about three minutes.
-Oh, goodness.
-And let me show you.
That is as stiff peak as stiff peaks can get.
-It is so glossy.
-And now, so... [ Laughter ] I'm just going to start kind of dolloping it all the way around.
If I was to start in the center, sometimes you might not get full coverage evenly.
So, the first thing I do -- I do want to make some swoops and swirls.
But the first thing I want to do is use my offset spatula and kind of push it towards the edges.
This time I really want that meringue to kind of lock with the edges of the crust there.
You want it to touch.
And I always think that this is the hardest part.
You don't want to cover up that crust too much because it's pretty, too.
-Mm-hmm.
-Alright, and then you can use this to make swoops and swirls however you want.
I also like to use a spoon for this.
-Mm-hmm.
-Because you can really get that big kind of porcupine swirls and swoops.
This could go straight under the broiler.
And we have instructions for how to cook this under a broiler on our website.
But I'd like to use our old friend.
There we go.
-Oh, you know it's a good time when you have a blowtorch in the kitchen.
-I want to use a moderate heat.
And then, this is great -- I put it on a cake plate here because it's going to be easy for me to turn it.
And when you're just starting with one of these, you want to start kind of far away, about two inches away, and sweep it back and forth.
And it's going to naturally pick up those peaks and the swirls.
-Oh, my gosh, Bridget, that looks like so much fun.
-Would you like to try?
-Yes, I thought you'd never ask.
-And it's totally fine if it gets a little bit of those charred tips, because that's just like a s'more.
-Whoo-hoo-hoo!
-Good news.
It's time to eat.
-Ooh!
-So, I've got a couple of different things that, depending on the type of pie, you might want to use a chef's knife to cut through.
Sometimes it's good to get the first few cuts with a boning knife.
It's a bit more flexible and the tip is super sharp, so you can really get into the center of the pie.
I also have here a hot glass of water and a damp towel because there's a lot of goodness inside.
Alright, so, I'll make that first cut.
Just drag it.
-You're not messing around.
Oh!
Precision, Bridget.
-What do you think?
-That was pie precision.
-Pie precision.
Love it.
-Oh!
-Alright.
-Alright, I'm not waiting any longer.
I'm going in.
-That's beautiful.
-Mmm!
-I just had to take a moment, though.
-The marshmallow on top, because it's toasted, really does make you think of a s'more.
And the graham crackers with the chocolate.
The chocolate!
There's the deep chocolate that's kind of fudgy, like the brownie.
And then you get that milk chocolate ganache.
-You know how when you're making a s'more and that chocolate starts to melt and on the inside it's all goopy, but on the outside it still looks set?
That's exactly what this reminds me of.
-Mmm!
Man, that's good.
-Let's give it up for that graham cracker crust.
-That is one sturdy crust you made.
-Oh, Bridget, this is awesome.
-It's the stuff that campfire dreams are made of.
-It is.
-Did I get my merit badge?
-You did.
This is better than any s'more I've ever had, actually.
And we got to play with the blowtorch!
-And we get to eat the rest of that.
-Thank you.
-You bet.
-If you want to make this amazing pie, start by making a graham cracker crust.
Add a brownie layer, followed by a fudgy ganache.
Then top with a Swiss meringue and toast it with a torch.
From "Cook's Country," a magnificent recipe for s'mores pie.
It's a looker as well, you know what I mean?
Like, it's the full package.
-It-- It's spectacular.
♪♪ -A good quality rolling pin is essential to any home baker, and luckily for me, Adam's here.
He's going to take us through a whole bunch of different types of rolling pins.
I see a lot here.
-You do.
You definitely do.
We had 10 rolling pins in our lineup.
The price range was $10 to $70.
Three different styles.
You have the traditional ones with the handle at either end.
-Yep.
-Familiar to everybody because we all got them from our grandmothers.
-Absolutely.
-Here you just have straight cylindrical rolling dowels without handles, and also without handles, you have tapered rolling pins, which are French rolling pins.
Materials.
We have wood, we have metal, we have marble and plastic.
And we had a bunch of testers -- some with a lot of experience, others who are pretty new to baking -- use all of these to roll out doughs for pie pastry, cookies, and pizza.
-Okay.
-Let's talk about style first.
-Sure.
-Our testing squadron did not love the old-fashioned style with the handles.
You know, you have a handle at either end.
Your instinct is to hold the handles, as opposed to putting your hands in the center.
That separates your hands from where the real action is.
So, testers felt like they couldn't get a good sense of what was going on with the dough underneath the pin.
They didn't know how thick it was.
They weren't sure how hard to press.
Also, if you have a shorter barrel like this, you cover less ground with each roll, which means you could potentially overwork the dough and it would bake up a little tough.
They definitely like the ones without handles better.
In terms of the rolling dowels, you actually have one over there.
You want to give it a try?
-Yeah, sure.
-These are a little heavier.
They're a little longer than the tapered pins.
That's one of the things they really liked.
It grabs onto the dough a little bit.
So, the dough is responsive underneath.
And it holds a fine film of flour so that it's a little less sticky.
The weight range that they liked was about a pound to a pound and a half.
Some of the rolling pins got as heavy as four pounds.
-Yeah, with the marble?
-Yeah.
Too heavy.
-I've got like a whole collection of really bad rolling pins.
-[ Laughs ] The Lancaster Bad Rolling Pin Museum.
-Exactly.
-There were also some fans of the tapered models.
You have one there.
You want to give that a try?
-Yes, definitely.
And this is the one I use most at home, I got to say, because I love the fact that you can really create the shape, and this is great for round doughs.
-And that's exactly what our testers thought.
They're a little thinner, they're a little lighter.
It was easier to get around that way.
One thing you want to pay attention to is the length of straight area in the center.
If it's too short, you could again overwork the dough a little bit.
Ranged in our lineup from 5.2 inches to 9.5.
-Big difference.
-Big difference.
You had the 9.5 straight area in the middle.
Testers like both the dowels and the tapered pins and had a recommendation in both categories.
The favorite dowel is the $29 J.K. Adams plain rolling dowel.
-There you go.
-It's about a pound and a half.
It's about 19 inches long, so it's the sweet spot in terms of both length and weight.
Really good for less experienced bakers.
If you want that fine control, you want to get a J.K. Adams French rolling pin.
This was $20, and this had 9.5 inches of that straight area in the center.
-Yeah, where were you 20 years ago when I started collecting bad rolling pins?
-I want to visit the Lancaster Museum of Bad Rolling Pins.
-Yeah, yeah, we're closed on Sundays, though.
So, if you want to pick up a couple of rolling pins for your home, look no further than our winner is the J.K. Adams plain rolling dowel pin.
That runs about $29.
Or if you prefer a tapered pin, our winner is also J.K. Adams.
It's the J.K. Adams French rolling pin, and that runs about 20 bucks.
♪♪ -Morgan and I share a love of soft and chewy butter cookies studded with gooey chocolate.
Don't we, Morgan?
-Yes, Toni, I love chocolate chip cookies so much, my best friend told me they're my love language, so I'm very excited to make them with you.
So, here I'm starting with 11-1/4 ounces of all-purpose flour, which is also 2-1/4 cups.
I really like using weights when I bake.
And to that, I'm going to add a teaspoon of table salt.
And I'm also going to add 3/4 teaspoon of baking soda.
So, this is something I learned from a friend of "Cook's Country," Judiaann Woo.
She's a baker out in Portland, Oregon, and she uses extra baking soda in her cookies because what it does is in the oven, it causes them to souffle and then collapse on themselves.
It sort of sounds like it's a mistake, but what it actually does is makes a really gooey center.
It sort of, like, condenses it.
It makes it really nice and chewy.
Okay, so now that our dry ingredients are all whisked together, we can move over to our wet, and you'll see I have 12 tablespoons of melted butter in here.
I'm using unsalted butter because we already had our salt in there.
-And melted.
-Yeah.
So, it's not softened.
You don't see a stand mixer.
That's on purpose.
So, to this I'm going to add a cup of light brown sugar, which if you're going with weights is 7 ounces, and 1/2 cup of white sugar or 3.5 ounces.
And I'm just going to whisk these until they're nice and combined, which will take about 30 seconds.
When you cream cookies in a stand mixer, you get a little bit of a cakier cookie.
And I want this to be really gooey and chewy.
And so, that's what we have the melted butter for.
I like to use a mix of brown sugar and white sugar.
I feel like you get just a little kiss of molasses, but not too, too much.
Okay, so to this I'm also going to add a large egg and a large egg yolk and 2 teaspoons of vanilla.
So, this is a good hit of vanilla.
I'm going to whisk this until it looks emulsified which will take about 30 seconds.
So, nice and emulsified here.
I like to add the flour in two stages because it gives you a little control in mixing.
If you overmix it, you can have a tough cookie.
And once you start mixing the flour, you're developing gluten, and you don't want to do that.
I'm just going to get this nice and fully combined.
Here, I don't have to be quite as careful since I'm only doing half of it.
I'm not worried about developing too much gluten.
Alright, and now I'm going to add the other half of the flour.
Okay, Toni, I promised you extra special cookies.
So, I'm actually going to add in M&Ms.
-I was looking for the chocolate chips.
-Yeah, well, these are so fun.
Look at this.
So, here I have 9 ounces, which is 1-1/4 cups of M&Ms.
And I just feel like they're so fun in a cookie.
So, now I'm going to fold this in with the rest of that flour.
-Well, I think it's really fun that you're using M&Ms because of course they're going to make it more colorful.
And do you know the story about how we got M&Ms?
-No.
-So, during World War II, the Mars Company created this candy coating to go on the outside of chocolate pieces in order to provide chocolate that wouldn't melt to servicemen.
-Oh, I love that.
So, we have our nice dough.
It looks nice and together.
And now it's time to portion.
We're going to divide this into 16 equal portions.
So, it's about 2 heaping tablespoons each.
It's also 2 1/4 ounces, if you like using a scale.
But I just have a good old-fashioned tablespoon measures for us.
-Okay.
-So, you're aiming for eight on your tray and I'll do eight on mine.
Did you and your family bake a lot of cookies?
-We did bake a lot of cookies.
My first job as a reporter did an interview with Wally Amos, Famous Amos.
So, I had this recipe.
Anyways, I thought my recipe was the best.
My son came home from middle school class.
He was like, "I got the best recipe ever."
Sort of like what you said.
And we actually had a bake-off.
We loved them so much.
And then that weekend, my son's recipes were better than mine.
-Wow.
-So funny.
The recipe really worked.
So, I love this idea of secrets and techniques that are just like tricks.
-So, now you roll them between your hands into pretty balls so they're nice and even.
So, we're almost ready to bake.
-Okay.
-But I do want to press these down to 3/4 inch and put it here and actually get down and do 3/4 inch.
And this is just going to help it spread and start in the oven.
Now that I have one, I'm just going to eyeball the rest.
We'll just help them even out.
Otherwise you would have a cookie ball, which doesn't really sound like the worst thing in the world, but we want a nice, beautiful, bakery-style cookie.
Okay, so we're ready to bake.
Usually we bake these one at a time, but here we have the gift of two ovens, so we can bake them both at the same time.
I do have a 425 degree oven set, which is a hot oven for cookies.
Most are baked at 350 or 375 degrees.
This is another thing we learned from Judiaann.
The high oven temp causes them again to puff and collapse on themselves.
So they're only going to bake about eight minutes, turning them once halfway through.
-I can't wait to see.
Oh, they're beautiful.
-They are beautiful.
Those are perfect.
-It smells so good in here.
-So, you can see they're quite blonde and they're nice and puffed.
I actually am going to let them cool on the sheet for five minutes.
I'm going to transfer them to a wire rack and let them cool 10 minutes, and then it's cookie time.
Toni, it's time to eat.
So, should we dig in?
-Are you ready?
-Yeah.
I think I'm going to go without milk first.
-Oh, it's good and chewy.
-Mmm.
-Mmm.
-I'm so curious.
The moment of truth.
I'm like, "What do you think?"
Tell me.
-I think they're delicious.
They're really buttery, chewy.
And it's interesting that this is a different kind of chocolate.
You get that little candy crisp that just gives it a totally different chocolate flavor.
-Both the milk chocolate in here does something, and that candy shell.
Like, I feel like you get this really nice, salty sweet with that amount of salt we added.
Like, it's a really nice balance.
-It is good.
Let's see what happens when we dunk.
-Mmm.
-Mmm.
-Really brings out the flavor and the texture even more.
-I know.
I love it.
-I love it.
-I'm into it.
-Cheers.
-Cheers.
-Thanks, Morgan.
-Thank you, Toni.
-And if you'd like to make these fun and delicious cookies, add a little extra baking soda for lift.
Fold the flour into the batter in batches, and jumpstart the baking in a hot oven.
So, from "Cook's Country," delicious and chewy M&M cookies.
You can find this recipe and all the recipes from this season, along with our product reviews and select episodes at our website, cookscountry.com/TV.
I cannot wait to make these for my family.
-I can't wait to hear how it goes.
-I'm going to win the contest.
-Let us help with dinner tonight.
Visit our website anytime for the newest seasons, fail-proof recipes, full episodes, ingredient advice, and equipment reviews.
cookscountry.com/TV.
"The Complete Cook's Country TV Show Cookbook" includes every recipe, tasting, and testing from all 17 TV seasons.
With over 650 recipes, it's our most comprehensive collection of "Cook's Country" TV recipes ever.
The cost is $24.99 -- $15 off the cover price of $40.
To order, head to our online shop at cookscountry.com/book.
-Funding for this program has been provided by the following.
-Monument Grills, offering innovative technology and design for the grilling enthusiast.
With a lineup of gas grills to suit every level, our mission is to ignite your passion to pursue the art of grilling.
Learn more at monumentgrills.com.
♪♪ ♪♪ ♪♪ ♪♪ ♪♪ ♪♪


Cook's Country is presented by your local public television station.
Distributed nationally by American Public Television